Now that I've shown you the Beer Can Hat basics, we can really get funky. It's time to stack the cans high and crochet the best top hat ever!
You want to make an impressive bbq entrance? Be the belleof the beer fest? I got you. This hat makes a statement!
I recently perfected my extra tall can stacking crochet techniques while making a triple tall hat for my husband's birthday. I just posted a video of the making, no talking, no instructions. Just music and occasional sounds of the cheesy shows I watched those rainy days. Ha.
Two Levels of Reg or Tall Cans
Here I decided to use 2 levels of regular size cans, just for ease of fitting on my lap I guess. Tall cans are just as easy to assemble and would be extra awesome. I will also show you how to add more levels if you are feeling daring. When finished, the levels are surprisingly stable!
So go forth and wear a gigantic top hat made of crochet and beer!
Show em who's boss. The one with the biggest beer hat wins.
In this tutorial, we'll make a 2 (or 3) level Beer Can Hat out of regular size beer cans, and a flat brim. Top hat style. Tall cans can be used instead, as noted below. Here I will go over the basics rather briefly, since I've covered them in depth already. For more detailed instructions see my 3-in-1 Beer Can Party Hat Tutorial and Video. Alright! Let's do this!
Materials & Tools
Acrylic yarn like Red Heart
I Hook
Utility Scissors
Paper Hole Punch
Just a few tools needed.
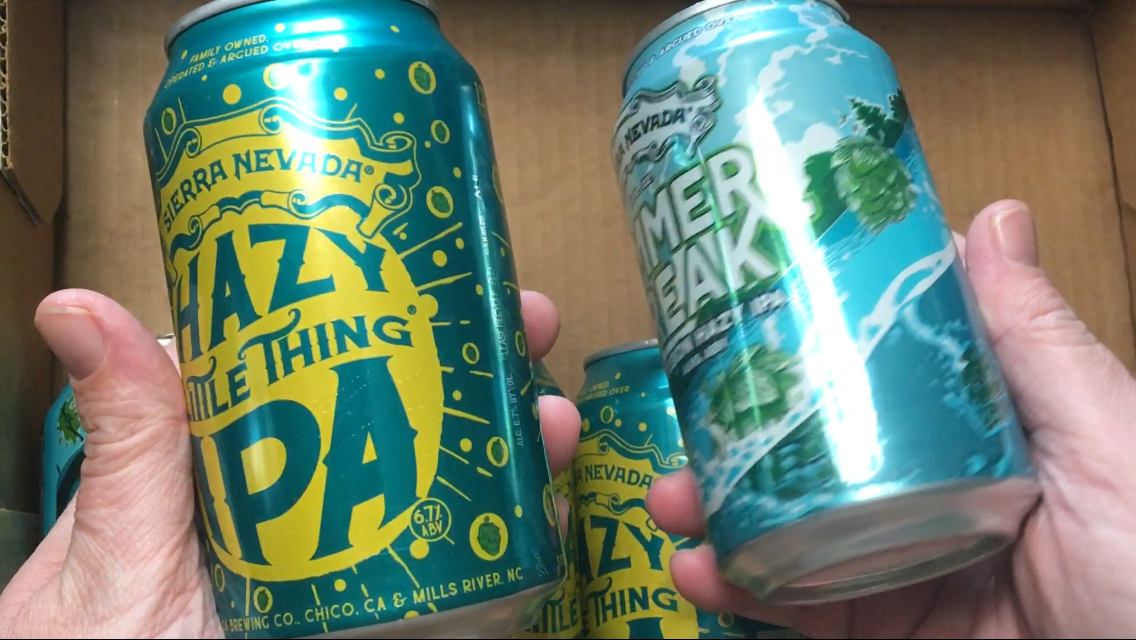
And 12 Aluminum Can Labels
Sierra Nevada has some great can art!
Cut the Cans
Cut the can label into a rectangle about 3in across.
Cut the labels into rectangles.
Smooth the edges and round the corners.
Round the corners.
Repeat for 12 labels total.
So. Many. Beer labels.
Punch the Holes
Use the hole punch to make 4 holes along the top and bottom of the labels, and 5 up the sides (6 for talls).
Punch 5 holes up the sides.
Punch 4 holes across.
Edge the Labels
Single crochet around, working 3 stitches into each hole, 5 in the corners.
Round 1
12 labels total
Work a second round of singles, with 3 in the corners.
Round 2
Note: All of the above info is covered in more detail in Part 1 of the 3-in-1 tutorial.
Join the Labels
Here's where things get interesting. We are going to join our labels differently than I showed you before. Instead of joining the sides of the labels into a crown, we will join them at the top and bottom ends. So lay out your labels the way you want them for the hat.
I like my seam upside down, other way is fine too.
Join at top/bottom edges.
Then take 2 that are sitting above/below each other, and join them at the edge where they meet.
Line up the stitches of both labels.
Join by holding the labels back to back, line up the stitches, and single crochet through both layers across.
Work singles through both layers.
Single crochet across label, corner to corner.
Continue on to the next pair of labels without stopping, and so on across all the pairs.
Continue to next pair without stopping.
Repeat with all pairs of labels.
Do not connect to where you started, just leave them flat and tie off.
Note:
Notice I like to work them upside down. The seam will angle a little,
and I like it that way better. Just a personal preference. Right side up
works fine too.
Lay them out flat, tie off.
If you want to add another row of labels, just repeat what we just did above. You could possibly go taller, but the challenge would be balancing it on your head I think. But hey, go for it!
Repeat to join another row of labels. Why not??
Now turn everything sideways and work a seam along the longer sides.
Turn work to join the vertical seams.
Single crochet like before.
Join last seam to create a crown.
Repeat with each seam, then join the first to last to make your Crown... Gigante!!
Finish the top and bottom edges with single crochet.
Finish edges with single crochet.
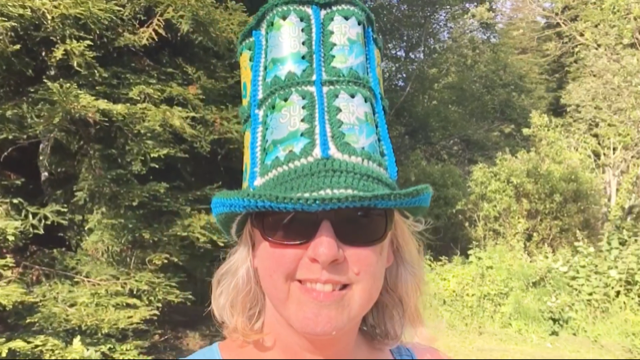
Now we are getting somewhere! I must say, I might need a double tall Crown with some sweet crowny trims on top... befitting the Queen that I am. Yes.
Double tall crown achieved!
Crochet the Top
We'll use the exact same Top from Part 2 of my 3-in-1 tutorial for the regular shape. That's starting with 12 doubles into the ring, then alternating singles and doubles each round.
Start with 12 double crochet into a ring, round 2 is 2 singles per stitch.
Round 5 is 3 doubles between increases.
Increase as a normal flat round, adding 1 stitch between increases for each round, 7 rounds total. See Part 2 for more details.
Hat top complete.
Join the Top to the Giant Crown
Line up the stitches and single crochet through both layers around.
Hold pieces back to back.
Stitch through both layers.
Top is joined to the crown.
Add a Flat Brim
For this flat, top hat brim, we will alternate doubles and singles each round, for 6 rounds total. Increase similar to the Top, adding 1 stitch between increases, but only on the double crochet rounds.
So round 1 is 6 doubles between increases, and round 2 is straight single crochet. Continue like this until you get to round 6.
Round 2 is straight single crochet.
Round 3 is 7 doubles between increases, Rnd 4 is singles again.
For round 6, work 9 singles between increases.
At first I added a band, but this one fits better without it.
There you go! I ask you, who exactly can beat this giant kickass beer can party hat?? Nobody. Correct. Now get busy and show them what Extreme Beer Crochet is all about.
**Update! April 2022** My first ALL NEW Beer Can Hat Tutorial and video is up!! Woohoo! Many more tutorials coming, this is just the beginning! *New* 3-in-1 Beer Can Party Hat Tutorial - Part 1: The Crown !!More details and a preview video: Coming Soon! NEW *Creative* Beer Can Hat Tutorials All *NEW* Beer Can Party Hat Tutorials are Actually COOL! Okay. Carry on. I'm going to attempt to share with the world my pattern for the coveted Beer Can Hat. Some years ago I started making these and spread them around to many friends and unsuspecting acquaintances. I believe they originated during the 70s cheesy crafts era, which I completely adore. Many a birthday party have I attended bringing a 6 pack of beer, a skein of yarn, a couple compact tools... and a few hours later, left the host with a special party hat and gift made right before his drunken eyes. Now YOU can be that fascinating craft nerd, amazing your friends at parties. Or just drinking and crocheting at h...
BEER CAN Crochet Cowboy Hat Full Tutorial w/ Video Beer Can Crochet Cowboy Hat - Tutorial & Video Ok! Finally moving on to some funner shapes and designs. I love this!! I wanted for sure to make a Cowboy beer can hat, and I gotta say I like it. I figured out how to make a dip in the top which I think looks pretty cool. And pinned the brim on the sides all country like. It really is a good size sun visor! Which you will need when you are sporting this around town all summer. Video: BEER CAN Crochet Cowboy Hat - Full Tutorial Full Crochet Pattern for Instant Download HERE.
**Update! April 2022** My first ALL NEW Beer Can Hat Tutorial and video is up!! Woohoo! Many more tutorials coming, this is just the beginning! *New* 3-in-1 Beer Can Party Hat Tutorial - Part 1: The Crown !!More details and a preview video: Coming Soon! NEW *Creative* Beer Can Hat Tutorials All NEW Beer Can Party Hat Tutorials!! (Continued from Part 1 ) See Crochet Basics for stitch descriptions and abbreviations. Note: I used tall cans for my sample hat, adjustments for using regular size cans shown in [brackets]. 3. Edge the Can Labels Basically, the cans will be edged just like a granny square. 5 dc into each corner, and 3 dc into each hole along the sides. For those who prefer a written pattern, here you go: Sl st into corner hole, ch 3 (counts as 1 dc). Work 2 dc into same hole. *Work 3 dc into next hole and each hole across. Work 5 dc into corner hole. Repeat from * around label, ending with 2 dc into starting hole. Sl st...


Comments
Post a Comment