Crochet BEER CAN Party Crown! Easy 3-in-1 Hat Tutorial - Part 1
Crochet BEER CAN Party Crown!
Easy 3-in-1 Hat Tutorial - Part 1
 |
| Ultimate Beer Can Party Hat Tutorial |
 |
*All New* Beer Can Hat Designs!
Woop!! Finally! I've been reworking and improving my Beer Can Hat crochet patterns like crazy. I'm super excited, maybe too excited, to present all my new designs!
As I mentioned before, these new patterns have simpler construction and a tighter, nicer finish.
They're also much more fun and creative! With lots of options to personalize your can creations.
If you're curious about how I became a world famous and published beer can hat designer, see my promo video here: NEW *Creative* Beer Can Hat Tutorials 2022
- A link to a video tutorial on my youtube channel.
- A link to a complete pattern in my little store.
Starting with my...
*Deluxe* 3-in-1 Beer Can Party Hat
Crochet Tutorial
Video: Crochet BEER CAN Party Crown! Easy 3-in-1 Hat Tutorial - Part 1
Full Crochet Pattern for Instant Download HERE
3 Part Series = 3 Hat Possibilities!
This is a very comprehensive tutorial that will teach you to crochet a complete Beer Can Hat in 3 Parts. Each Part is a step in the process, but each Part can also be a hat on its own! What?? Genius!
Easily Adapted to Real Live Party Crochet Situations
So when you are crocheting a Beer Can Hat at the party (dazzling and confounding everyone around you), and feel the *need* to dance or do too many shots or whatever... you can finish up quickly and still be the Craft Nerd Party Hero of the night. I am here for you.
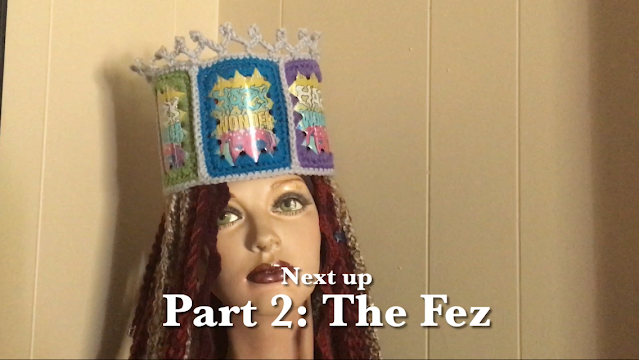
Part 1: The Crown
Part 2: The Fez :
With the Crown together, I'll show you how to add the top of the hat, tighten up the edge for a more Fezzy shape if desired, and a tassel option.
Dude! Seriously??
I know! It's a lot of great stuff. After these 3 tutorials, you will be making all kinds of creative Beer Can Party Hats. But of course, there will be more designs coming. Lots of them. yw.
For now, let's get started with...
Part 1: The Crown
Video: Crochet BEER CAN Party Crown! Easy 3-in-1 Hat Tutorial - Part 1
Tools and Supplies:
Crochet Hook size I - Susan Bates brand fits through the holes easily
Worsted Weight Yarn - cheap acrylic works best (see below)
6 Can Labels - each can will have 1 or 2 labels
Utility Scissors - household scissors work fine
Paper Hole Punch

Prep the Cans
Today in 2022, we have more beautiful and creative beer cans than ever before. My husband has been kind enough to help the effort by emptying a few for me. He says he likes to support the arts. ha. But the point is, Beer Can Hats are way cooler when made out of microbrew, or energy drinks, or soda pop, or something colorful and more fun than the old Coors cans. Go find some!!
For The Crown, I am featuring Lagunitas Hazy Wonder IPA and Mug root beer.

Rinse them right away, they are hard to clean later. And gross. Do not trust your designated drinker if they say they rinsed them all out, they totally didn't.

Start by stabbing a non-cute part of the can, cut up to and around the top, then the bottom.

You will be left with a nice big label. Trim off what you don't need and cut to a rectangle about 3 inches across.
 |
| Trim the big label into 3 inch wide rectangles. |
Round the corners and smooth the straight edges. Don't worry if it's not perfect, the yarn will cover everything and it will look fine in the end. You just don't want anything that will snaggle the yarn.
 |
| Round the corners, smooth the edges. |
When you have 6 nice labels cut, it's time to punch the holes. For a regular size beer can, punch 4 across the top and bottom, and 5 up the sides. (For tall, punch 4 and 6.) Space them as evenly as possible, about 1/4 inch from the edge.
 |
| Punch the holes. |
Edge the Labels
Boom! okay time to crochet.
Oh about the yarn. I recommend using a nice cheap acrylic like Red Heart. It keeps the structure better, since it's more stiff, and holds up to rubbing the edges of the metal. Also Red Heart comes in a million colors and is super cheap on sale. They do not pay me to say this.
Single crochet all around the edge, working 3 stitches into each hole, 5 in the corners. Similar to a granny square. Mmm granny squares....
Tip: Keep your hook parallel to the can edge as you work. This helps assure the "legs" of the stitch can reach the edge comfortably.
 |
| Edging the labels with crochet. |

Optional: Change yarn colors for round 2.
Work a second round of straight single crochet, 3 in the corners. Tie off.
 |
| Using a second color for round 2. |
Repeat for all 6 labels.
 |
| For my rainbow, I chose to keep them solid. |
Joining the Labels
Take 2 labels and hold them back to back. Line up the stitches and work single crochet through both labels across, working corner stitch to corner stitch. Tie off. Remember to work each seem in the same direction.

 |
| Join 2 labels with single crochet. |
Repeat for all labels, join the first one to the last one to make The Crown.

 |
| Join first label to the last to form a Crown. |
Finish by working single crochet along top and bottom edge.
 |
| Finish the edges. |

 |
| Crown complete! |
Choose your own Beer Can Adventure:
If you want to add a top and maybe a brim, continue on to Part 2: The Fez.
If you want to be done and call it a Crown, you can stop here. Boom. Host gift complete!
If you want to add a fancy trim edge for maximum Crown effect, read on.
3 Options for adding a nice crown-like trim edge on top:
I think the fastest is a chain loop, where you single crochet then chain, skip a few stitches and single crochet again. Super fast. Here I worked 5 chains and skipped 2.
 |
| Chain some, skip some, single crochet. |
 |
| Loopy Crown trim. |
The way I did the smaller picot edge, was to single crochet, chain 8, slip stitch into the 5th from the hook, chain 3 more, then single crochet to the edge. Super cute! Here I skipped 3 stitches. A little slower but very crownarific!
 | |
| For the Pointy picot trim, chain 8. |
 |
| Slip stitch into 5th chain from hook. |
 |
| Chain 3, skip 3 stitches, single crochet. |
For the taller picot edge, I did the same as the smaller edge above, but set it on top of a treble crochet 2 together. Check out the video to see how I did it. It's a little more tricky to work, but this really is my favorite.
 |
| After treble2 together, repeat picot edge above. |

I like to layer both edges for supreme fanciness.
 |
| Tall and short picot trims layered together. Regal AF! |
Okay! At this point you are already a hero, believe me. Part 2: The Fez will show you how to crochet the top of the hat next. See you there!


Comments
Post a Comment