Quick Crochet BEER CAN Hats! Bucket & Cap Brims (3-in-1 Tutorial - Part 3)
Quick Crochet BEER CAN Hats: Bucket & Cap Brims
3-in-1 Tutorial - Part 3
 |
| Quick Crochet Beer Can Hat Tutorial - pt3 |
This
is so fun for me. Ha. I am giving you solid gold right here. So many
options and tips, you didn't know Beer Can Hats could be such a crochet
design hootenanny. Well, going by what I can find online right now, no
wonder! *crickets* Frankly I'm a little shocked nobody else is doing it.
But hey, I am here for you. And there are more patterns coming too!
Once more let me reiterate. I fully expect you to start taking delicious specialty canned beers to parties, then live crocheting a special hat gift for your host. Dazzling your family and friends, showing the world how funky and cool crochet can be, AND for sure leaving as the Craft Nerd Hero of the night. Yesss! Win win win.
 |
| Crochet Party Hero at work. |
If you're curious about how I became a world famous and published beer can hat designer, see my promo video here: NEW *Creative* Beer Can Hat Tutorials 2022
- A link to a video tutorial on my youtube channel.
- A link to a complete pattern in my little store.
Alright! Let's finish up Part 3 of my ...
*Deluxe* 3-in-1 Beer Can Party Hat
Crochet Tutorial
Quick Crochet BEER CAN Hats! Bucket & Cap Brims (3-in-1 Hat Tutorial - Part 2)
Full Crochet Pattern for Instant Download HERE
3 Part Series = 3 Hat Possibilities!
This is a very comprehensive tutorial that will teach you to crochet a complete Beer Can Hat in 3 Parts. Each Part is a step in the process, but each Part can also be a hat on its own! What?? Genius!
Easily Adapted to Real Live Party Crochet Situations
So
when you are crocheting a Beer Can Hat at the party (dazzling and
confounding everyone around you), and feel the *need* to dance or do too
many shots or whatever... you can finish up quickly and still be the Craft Nerd Party Hero of the night. I am here for you.
In Part 1: The Crown, I covered how to process the cans, crochet them into a Crown, AND 3 trim options for maximum crownability.
In Part 2: The Fez, we added the top of the hat. I gave you an option to create a more angled Fezzy shape, and a tassel. Grand Poobah style.
Now it's time for...
Quick Crochet BEER CAN Hats! Bucket & Cap Brims
3-in-1 Tutorial - Part 3:
I'll show you 2 brim options, cap or bucket (aka fisherman).
As well as a shorter crown shape,
AND a faster construction method. Yes, for those real life party crochet situations!
Here is the video tutorial of this post, and the full crochet pattern for sale here.
Featuring Sierra Nevada Pale Ale, Mug root beer.
Part 1 Redo: A Faster Method
If you already have your Crown (Part 1) and Top (Part 2) finished, you can skip to the Brim parts below.
Prepare the Cans
We are going to prepare the cans just like in Part 1, except for the size of the label. A shorter crown is a little faster, and might be slightly less uh, shall we say, dorky? A bit more 'wearable' I guess. But also possibly less of a show stopper. Where Beer Can Party Hats are concerned, I believe bigger is better, but you know. Options.

So, for this option, cut the labels to about 3 inches square. Watch the artwork to make sure it fits nicely. Sierra has the squares built in, which is handy.
 |
| Cut label into square. |
Punch the holes, 4 on each side.
 |
| Punch the holes. |
Edge the Labels
Crochet around the edges of the can labels, just like in Part 1, except skip the second round of single crochet. See below.
 |
| Edge labels with crochet. |
Join the Labels
Here's where things go a little bit faster. We are skipping that second round above, and joining them as they are, with a slightly different stitch. Instead of joining with single crochet like before, we will work single crochet 2 together:
Hold 2 labels back to back, I find it easier to hold the one closest to me (Front label) a bit lower than the far label (Back label). Lining up the stitches of both labels, we are going to work a single crochet 2 together. Pull the first loop through the Front label, and the second loop through the Back label. Finish stitch.
 |
| Draw 1st loop through Front label. |
 |
| Draw loop through all 3 loops on hook. |
Do that across, working corner stitch to corner stitch, and each seam in the same direction. Careful not to pull the stitches too tight, looser is better with this part.

Repeat for all labels until you have a Crown.

Finish the Edges
Now, instead of working single crochet along the edges of the Crown (as we did in Part 1), this time work double crochet along top and bottom edges. Make sure to work 2 stitches into the joining stitch, one on either side of the ridge.
 |
| Work stitches into corners and 2 into seam. |

A little personal note here, about Sierra Nevada. It just gives me a nostalgic feeling of home. Such a staple beer here in Humboldt county, CA... like Bud is for some places I guess. It reminds me of when I first moved here and learned to drink real beer, ha. The color and artwork are great too. I chose a variegated green yarn for the 70s feel, a nod to old school crochet and afghans. Classic! But the color matches the cans exactly. With the brown I think it looks like the forest, which I'm surrounded by. Really the perfect Humboldt hat! I think I'll be wearing this one. I know, nyerrrd. Bah I love it!
Add the Top
Follow directions in Part 2 exactly, for the regular hat shape.
 |
| Follow the link to Part 2 for making the Top. |
Join the Top to the Crown
Hold the Top back to back with the Crown labels. Line up the stitches and single crochet though both layers around.
 |
| Single crochet through both layers. |

Choose a Brim
Okay! At last we come to the final Choose Your Beer Can Adventure moment. I have 2 brims to choose from here, Cap or Bucket Hat.
Cap Brim
Notes:
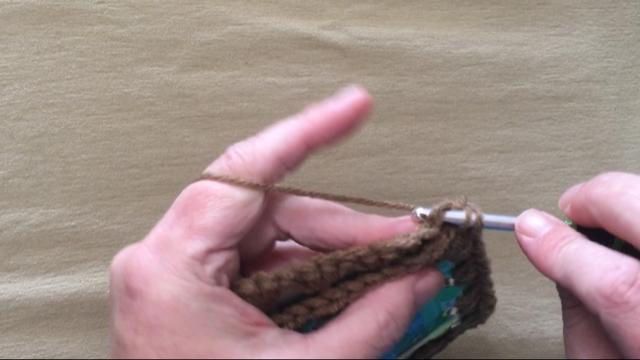
This brim will run from the center of one label to the center of the second label over. We will work in rows, so chain 1 and turn each time. Alternate single crochet and half double crochet as described. Increase by working 2 stitches into one spot. Decrease by working 2 together.
 |
| Cap brim fits between where my thumbs are here. |
Starting in the center of any label, work 29 single crochet, ending in the center +1 of other label.
 |
| Row 1 single crochet. |
Row 2 is half doubles. Decrease on both ends. Then 5, 6, 6, 5 stitches with increases at the commas.
 |
| Row 2, hdc2Tog into first 2 stitches. |
 |
| Finish the stitch. |
 |
| Do it again at the end of the row. |
Row 3 is straight singles across.
 |
| Row 3 single crochet. |
Row 4 is half doubles. Decrease on both ends. Then 8, 8, 8 stitches with increases at the commas.
 |
| Row 4, decrease at both ends like before. |
Row 5 is singles. Decrease on both ends. Otherwise work stitches straight across. Tie off.
 |
| Row 5, decrease at each end with sc2tog. |

Finish the edge by joining a new yarn at the back of the hat. Single crochet around to the brim.
 |
| Starting at the back of the hat, single crochet. |
At the inner corner, work 2 together. It's hard to show you exactly where I put mine, but just pick two spots. Try to do it the same way on both sides, it will be fine.
 |
| Sc2tog into inner corner, then 4 singles up the side. |
Then 4 singles up the side of the brim, ending in the corner.
 |
| End with single in outer corner stitch. |
Slip stitch across the front of the brim. Single crochet in the other corner plus 3 more down the side. Work 2 together into the inner corner, same as the other side.
 |
| Sc2tog into inner corner like before. |
Continue working singles around. Tie off.
 |
| Continue single crochet. |

 |
| Betty is always cool. |

Fisherman (Bucket) Brim
Notes: For this brim, the shape is rather angled down. I will cover a more flat brim in future tutorials. But today, we are going to increase (2 stitches into one space) each round, just like we did for the Top in Part 2. For each successive round, we will add 1 stitch between increases. This time it's all double crochet until the last round, which is singles.
So Round 1 is doubles with 11 stitches between increases.
 |
| Round 1 |
Round 2 is doubles with 12 stitches between increases.
 |
| End of Round 2 |
Round 3 is 13 doubles between. In Round 4, we'll tighten up the edge by working single crochet. Work 14 singles between increases. And tie off.
 |
| Round 4 single crochet. |


Whew! I did it! 3 Parts, 3 Steps, 3+ Hats. So fun. Next I'll be posting my full crochet pattern for sale in my etsy store, so look out for those live links in each tutorial. Don't forget to check out the video tutorials on my youtube channel too. You can see what a goofball I am irl. ha. But also some parts might be easier to understand in video form, so there you go.
How fun is this?? I hope you are enjoying the Beer Can Hat Life as much as I am. Much more to come, so I'll see you in the next one!


I cannot find your pattern on Etsy. Can you please help?
ReplyDeletehttps://payhip.com/BohemianMermaid Here is my little shop, working on adding a bunch more patterns soon! I'll prob get my etsy store up again when I have a few more ready. Thanks!!
ReplyDelete