Posts

Project Requests

Image
So I'm going to be adding more projects to the site soon, and wondering if there's anything you'd like to see here. Crochet patterns and techniques, beading projects, fabric printing and silk painting are on my list so far. Any ideas you would like to see in these areas? Please let me know! I want to make this fall a fun new project time at The Palace.

Where am I??

Image
I'm around. I come here from time to time and sigh over how long it's been since I posted... then wonder what to post. I guess I'm having some kind of identity crisis regarding this blog. I mean, I like to post the random stuff I'm doing, with my dye work and the craft shows. But it looks like the only folks who actually come here to read it are looking for free crochet patterns. So then I think I should post a few new patterns... but I don't really have time when the craft shows are happening. And that's when I go back to facebook and talk about what I'm doing. I'll work on it. I do enjoy my little blog... but who wants to talk to an empty room? Of course, if you're really interested in my little clothing business and Mermaid adventures, you can go to the FB link right over there >>>> and read new stuff all the time. Maybe what I should do is connect these two, and start posting on the blog which will automatically post to fb. Hm. I...

Free Crochet Patterns & Craft Tutorials List

Image
I thought it would be handy to have a list of all my free crochet patterns and craft tutorials in one place. So here you go!  These projects and patterns are the original designs of Bohemian Mermaid and are in all ways FREE. Go ahead and make them for sale, print and share, do whatever you like. Just please give credit to Bohemian Mermaid and link back to this blog. Enjoy!   ~Crochet Patterns~    Crochet Basics: A Handy Reference Basic Hat Beer Can Hat Erica's Tweed Cloche Easy Slippers ~Craft Tutorials~    Beer Can Hat   Making the Daphne Book   Outdoor Dog Bed Quick Recycled Notebook Painted Organza Flower (in progress) RockStar Can Tiara (in progress) ~Wedding Geekout~ Wedding Geekout  The Ring and Theme The Invitations The Clothing   The Jewels

Making the Daphne Book - Part 2

Image
Well, I am long winded as usual, so I'm continuing from Part 1 where I talked about tools and materials I used for the Daphne Book . Now I'll get into the process I used for developing the quiet book pages.  1. Design - I looked around the net a lot to get ideas, which also inspired more of my own ideas. Then I sat and sketched out my favorites. I thought about using different fasteners, counting, spelling, certain designs I knew I wanted to include like a robot and mermaid, etc. Very rough sketches, just to get the ideas down. I came up with 20 or so. Then I chose my favorites and decided I'd make 10 pages.   2. Refine - When I had a design I knew for sure I wanted, I would start a new page in my sketchbook and draw it out in the correct size. My pages are 9"x9" finished. I drew a 9" square and penciled my design, making changes until it was just right including all the details. I kept everything at least 1/2" away from the edges. I also consi...

Making the Daphne Book - Part 1

Image
Man, can I just say again how fun this quiet book was to make?! Seriously fun. I guess I don't make things just for fun much anymore... getting into the zone of all the drawing, cutting, tracing, sewing. Figuring out stuff. It was very meditative, relaxing. I worked on this project for over 50 hrs, nearly every day for a month. And every time I got going, it was hard to stop. I needed that. It really got my happy artgirl juices flowing. Plus, who can beat this first birthday present? Nobody, that's who. It's all part of my plan for awesome auntie domination. I shared pics of The Daphne Book , and now I'd like to share a little about my process. Let's start with the materials...  Felt or Fabric or Both? After looking at many quiet books around the net, I decided using all fabric was the way to go for me. Certainly, felt is cheaper, easier to work with and could have saved me some headaches. But I just like the look of all fabric, and I wanted to go the old fas...
The Daphne Book

Image
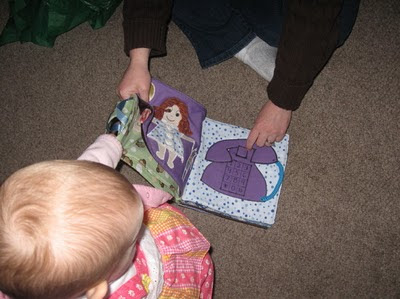
Okay, today I was finally able to give my gift to my niece. The quiet book I've been working on for the past month. For her first birthday, I wanted to make her something special that she could enjoy for a while. This will be something she can use as she grows over the next few years. Each page has a learning/playing activity. I'm really happy with the way it turned out. It was so fun to do and some of the pages I just love. For now I'll post some pics, and I'll probably do another post about how I made it . The little girl page has a dress that unbuttons and little undies inside. The dolly looks like the one I gave Lil D at her mom's baby shower, Alice Monkey Kitty. Below, the phone page for phone talking. Of course the headset comes off. I was just thinking of things little kids like, so I made this pet the kitty page. I already had the fake fur. Oh and she can tie the bow on the kitty too. Some day. The one below is so cute! I'll find the link to wher...

What?

Image
You think I should post more often than every other month? Oh. That's one way to go I guess. ..   The truth is, I haven't had much to report. The usual winter hibernation activities. Like, uh, nothing. Okay, that's not entirely true. At least for the past couple weeks, I've been going to the beach (we've been lucky enough to have sun and 60deg for a while!) and sewing a top secret project for my little niece's 1st birthday. I think it's safe to tell you it's a quiet book, my brother & SIL don't read this very often. After her birthday, I might post some pics and info. It's SO much fun to do... and turning out really cute! Back in Dec I did go through all my free crochet patterns and work up new samples of each. The idea was to take pics for a little pattern booklet. Most of those patterns were written years ago and the samples long gone. The only pics I can find are crappy, so I wanted new ones. I figured if I used good yarn, I could the...

The Jewels

Image
Oooooh I had some fun with these! Here is my lovely wedding jewelry, made of all sterling silver, natural mother of pearl, freshwater pearls and Swarovski crystals. In keeping with my beach theme, I love how these worked out. I think the crystals look like little water drops on the shells. Love it! I used sterling wire and headpins to wrap the beads into links and dangles. It's a little hard to tell (actually if you click on the pics they get much bigger), but the idea was to wrap extra wire around the top to make a sort of bead cap for each one. I think in the future I will do a post on how to wire wrap beads... I bought bulk sterling chain and attached it to a fancy wave clasp in the front, and I love the look of it! I did the same for my two best ladies, but with fewer dangles and a smaller clasp. They also got simple crystal earrings to match. I made a matching headband at the last minute, after looking at some online. For this, I used silver colored beading wire I...

The Clothing

Image
Ok, on to the fun part. You know, it took me a while to come up with a wedding dress design. Getting married is just not something I've ever thought about. I know it's typical to have at least passing fantasies about your wedding or dress sometime over the years... but I never did. I never planned on getting married, never wanted to ever before. Funny. So when I finally considered the fact that we might indeed marry at some point, I did some doodling and came up with a plan. In the end, the outfit looked almost exactly like this doodle.  The basic plan was a pseudo-Victorian-ish outfit made up of 3 layered parts - a ruffly jacket, a short dress and a long underskirt. Using the tan and brown as 'beach' parts, and blue as the watery part to fit my Ocean Wave theme. I decided Stu and I (and my sweet little niece Daphne, the ring bearer) would be the only ones to wear blue.  I made a Wave stamp and printed the design around the hem of my overdress, and added a...

The Invitations

Image
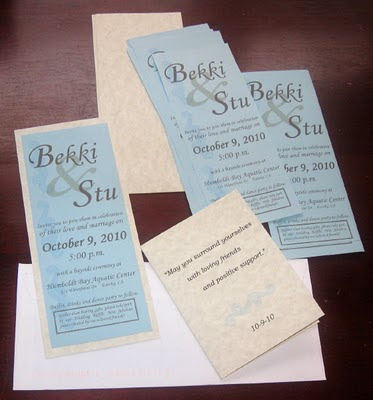
I made our wedding invitations as simple and cheapo as possible. Like I said, some things I just didn't care that much about. I looked online and folks seriously get into their diy invitations... I didn't have the time or the inclination to get off on them that much. Still, I am happy with the end result. Perfectly acceptable. We also decided to send out an evite, using Purple Trail . This way we were sure to cover everyone... most of my friends are online, most of Stu's are not. For some folks we had emails but no street address or vice versa. So, we just sent both types to everyone. I decided the cheapest way to do the printed invitations, was to format them so they would fit into a standard envelope. I chose the parchment card stock and blue paper to go with my wedding colors and theme. The parchment looks kinda sandy and I liked that. I just cut two rectangles and glue-sticked them together (if I were to do it again, I would use rubber cement for a better stick job)...