Posts

Showing posts with the label Craft Tutorial

Making the Daphne Book - Part 1

Image
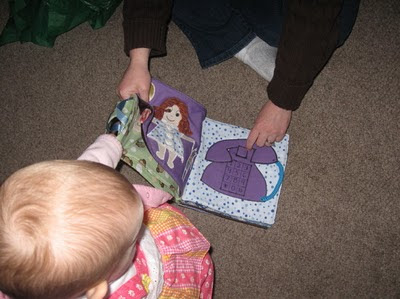
Man, can I just say again how fun this quiet book was to make?! Seriously fun. I guess I don't make things just for fun much anymore... getting into the zone of all the drawing, cutting, tracing, sewing. Figuring out stuff. It was very meditative, relaxing. I worked on this project for over 50 hrs, nearly every day for a month. And every time I got going, it was hard to stop. I needed that. It really got my happy artgirl juices flowing. Plus, who can beat this first birthday present? Nobody, that's who. It's all part of my plan for awesome auntie domination. I shared pics of The Daphne Book , and now I'd like to share a little about my process. Let's start with the materials...  Felt or Fabric or Both? After looking at many quiet books around the net, I decided using all fabric was the way to go for me. Certainly, felt is cheaper, easier to work with and could have saved me some headaches. But I just like the look of all fabric, and I wanted to go the old fas

The Daphne Book

Image
Okay, today I was finally able to give my gift to my niece. The quiet book I've been working on for the past month. For her first birthday, I wanted to make her something special that she could enjoy for a while. This will be something she can use as she grows over the next few years. Each page has a learning/playing activity. I'm really happy with the way it turned out. It was so fun to do and some of the pages I just love. For now I'll post some pics, and I'll probably do another post about how I made it . The little girl page has a dress that unbuttons and little undies inside. The dolly looks like the one I gave Lil D at her mom's baby shower, Alice Monkey Kitty. Below, the phone page for phone talking. Of course the headset comes off. I was just thinking of things little kids like, so I made this pet the kitty page. I already had the fake fur. Oh and she can tie the bow on the kitty too. Some day. The one below is so cute! I'll find the link to wher

Painted Organza Flower

Image
I was inspired by my friend Mary, who held a flower making workshop, to play with this organza flower. I wanted to try painting the fabric first and it worked out nicely! It was really fun to do, I'll be posting the instructions shortly...

Rockstar Can Tiara - Part 1

Image
Well I did it. I set out to make myself a Rockstar Tiara for my birthday and I succeeded. I had plenty of fun figuring it out... but it was by no means a simple little project. I did take plenty of photos and notes and will do my best to pass on my tiara knowledge in some understandable way. I'll apologize right now for using black yarn again. Not the easiest to see, but it really was the best color for the project. Materials: 3 tall Rockstar cans (I used the one above for my sample) 3 oz worsted weight yarn H or I crochet hook  utility scissors paper hole punch 60 Large pony beads yarn needle Cut out each star as shown, leaving a bout 1/2" border and rounding the tips. You'll notice one corner of the star hits the edge of the can, so you can't add a border there. We'll address this later to make the stars look symmetrical, for now just round the corner as shown in the photo. Cut out the vertical Rockstar word from 2 of the cans as shown. Le

Beer Can Hat – Part 3

Image
  **Update! April 2022** My first ALL NEW Beer Can Hat Tutorial and video is up!! Woohoo! Many more tutorials coming, this is just the beginning! *New* 3-in-1 Beer Can Party Hat Tutorial - Part 1: The Crown   !!More details and a preview video:  Coming Soon! NEW *Creative* Beer Can Hat Tutorials   *The Best* Beer Can Party Hat Crochet Tutorial     (continued from Part 2 )  See Crochet Basics for stitch descriptions and abbreviations.   5. Make the Base (Top):   I call this part of the hat the Base because that's where a hat usually begins. Crochet the Base of the hat from the Basic Hat Pattern . Work in the dc stitches as described until the underlined number is 4. You should end up with a nice circle that has 60 sts around the outer edge. Do not tie off. 6. Join the Base to the Crown: Hold the Crown and the Base wrong sides together with the labels facing you and matching up the stitches as you work. Sl st into any st at top edge of Crown, *insert hook through sa

Outdoor Dog Bed

Image
My girl Panda likes to sleep outside. In the summer, she likes sleeping on the dirt and grass... but now that it's winter and rainy, she can't really sleep in the mud. So she lays on the cement, which is not very easy on her old bones. I wanted to make her a dog bed that would be soft and weather resistant. I looked around the net for instructions and found nothing, so I thought I'd post my own How To Make an Outdoor Dog Bed project. Here you go... Honestly, I wasn't sure what to make it out of... I went to the fabric store to see what I could find. Here's what I bought: 1 yd Vinyl upholstery fabric (54" wide) 1 yd wool/polyester twill fabric (54" wide) 1 22" zipper Heavy duty sewing machine needles Starting with the vinyl, fold the fabric in half short-ways, to make the widest rectangle you can and measure it. Mine came out to 27" across by 36" long. Fold it right sides together so the edges match all around. On one short end

Basic Hat Pattern

Image
Ok, here you go... this is my own pattern for a basic crocheted cap, including adjustments for size and stitch variations. Rock on!  See Crochet Basics for stitch descriptions and abbreviations. Bohemian Mermaid Crochet Pattern Basic Hat Description: Simple, flexible instructions for a basic cap using any stitch design, sized for anyone in the family. Materials: Worsted weight yarn, I or J hook. Pattern: Instructions are for average adult/teen size fitted cap. The base is worked in dc. After working the base as described, any stitch can be used for body. Work is not turned. Change colors as desired. Base: Start : Ch 4. Sl st into first ch to form loop. Rnd 1: Ch 3 (counts as 1 st dc here and throughout). Work 9 dc into ch4 loop (10dc total). Sl st into 1 st dc (3 rd ch of ch3). Rnd 2: Ch 3, dc into same st. Work 2 dc into next st and each st around. Sl st into 1 st dc. Rnd 3: Ch 3, dc into same st and in

Beer Can Hat - Part 2

Image
**Update! April 2022** My first ALL NEW Beer Can Hat Tutorial and video is up!! Woohoo! Many more tutorials coming, this is just the beginning! *New* 3-in-1 Beer Can Party Hat Tutorial - Part 1: The Crown   !!More details and a preview video:  Coming Soon! NEW *Creative* Beer Can Hat Tutorials   All NEW Beer Can Party Hat Tutorials!!     (Continued from Part 1 ) See Crochet Basics for stitch descriptions and abbreviations.  Note: I used tall cans for my sample hat, adjustments for using regular size cans shown in [brackets].   3. Edge the Can Labels Basically, the cans will be edged just like a granny square. 5 dc into each corner, and 3 dc into each hole along the sides. For those who prefer a written pattern, here you go: Sl st into corner hole, ch 3 (counts as 1 dc). Work 2 dc into same hole. *Work 3 dc into next hole and each hole across. Work 5 dc into corner hole. Repeat from * around label, ending with 2 dc into starting hole. Sl st into 2nd of ch 2 from beginning.

Beer Can Hat - Part 1

Image
**Update! April 2022** My first ALL NEW Beer Can Hat Tutorial and video is up!! Woohoo! Many more tutorials coming, this is just the beginning! *New* 3-in-1 Beer Can Party Hat Tutorial - Part 1: The Crown   !!More details and a preview video:  Coming Soon! NEW *Creative* Beer Can Hat Tutorials All *NEW* Beer Can Party Hat Tutorials are Actually COOL! Okay. Carry on.   I'm going to attempt to share with the world my pattern for the coveted Beer Can Hat. Some years ago I started making these and spread them around to many friends and unsuspecting acquaintances. I believe they originated during the 70s cheesy crafts era, which I completely adore. Many a birthday party have I attended bringing a 6 pack of beer, a skein of yarn, a couple compact tools... and a few hours later, left the host with a special party hat and gift made right before his drunken eyes. Now YOU can be that fascinating craft nerd, amazing your friends at parties. Or just drinking and crocheting at home.  Al