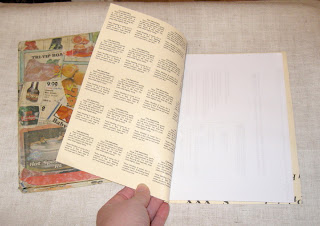
Quick Recycled Notebook

This is the first in a series of How-To articles I'm working on. I have a billion little projects in my head and I thought it would be fun to start posting them here. A girl's got to keep busy…
The other night I was brainstorming some of these projects, itching to make some lists, but couldn't find a clean notebook (I swear I have a green one that's practically new argh). After tearing up the house a little bit, I decided to just make one. I wasn't fussy so it took me about 10 minutes. Maybe I should number the steps, huh? Ok...
1. Prepare the Paper. I have acquired a good stack of reusable paper under my printer, as you have I'm sure. You can use full sheets or cut them in half. I personally had lots of 3/4 and 1/2 sheets from printing mailing labels for my ebay stuff, so I used those. I didn’t worry about them being the same size or cut straight, but you could use a paper cutter to even them out. Make a stack of paper thin enough for your stapler to go through. Face them all the same way (sounds obvious, but I missed a few in my fervor).
2. Add a Cover. Making the cover out of something a little heavier will help the notebook last longer. I used some misprinted card stock for my cover. If you don't have any, you could use an old phone book or catalog cover. Even slightly heavier paper with an interesting design (like an old poster) would be fine. Again, just make sure the stapler can go through it. Cut 2 pieces of your cover material slightly larger than your paper.
3. Staple the Binding. Stack your paper between the covers like a sandwich and line them up evenly on one edge to be your binding. Staple through all the layers. Mine was a bit too thick, so I stapled on both sides and covered the edge with clear packing tape to protect myself from the staple ends.
That's it! I'm happy with how it turned out… and how quickly. I felt great satisfaction in using those odd pieces of paper. Probably too much, I'm like that.
 The photo also shows a sketchbook I made in college using more involved methods. Still it was really easy and completely recycled. I was broke and just wanted it to last through the semester, but it lasted for years!
In the close-up, you can see I took small stacks of paper (from a ream I'd had forever, those were pre-computer days) folded in half and stitched them at the crease with a needle and thread. Then I took all the little sewn stacks and hot glued them to a strip of felt in the binding. The cover is cardboard that I decoupaged with grocery ads. To make it a little nicer, I glued the front/back pages to the inside covers. Pretty fancy!


Comments
Post a Comment